Introduction
When you have more than one monitor connected to a computer, you may experience issues with arranging the screens, or extending/mirroring the picture. This guide provides step-by-step instructions on how to use the Windows Display Settings menu to set up a multiple-monitor workstation.
Arranging Multiple Monitors
When using a laptop or desktop that's connected to multiple monitors, you may notice that the displays don’t seem to connect to each other in a logical way. Windows will try to “guess” how the monitors are arranged, but if it doesn’t get it right, you can manually adjust them in Windows Display Settings:
-
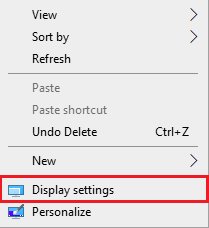
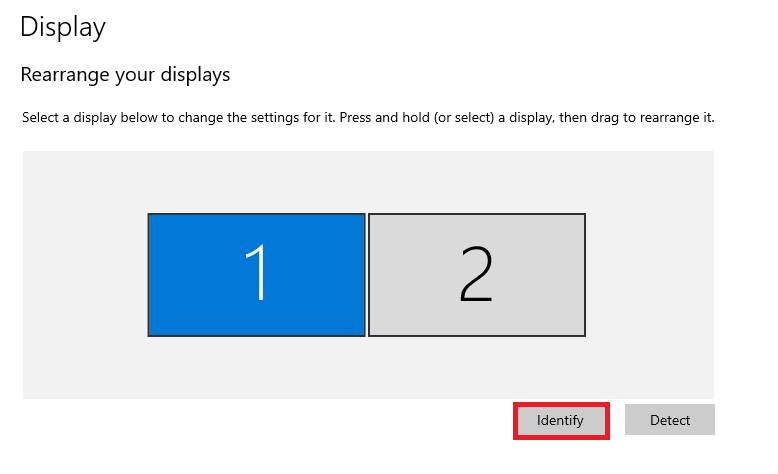
Right-click on your Windows desktop and then click “Display Settings” from the drop-down menu. Display Settings will show all of the connected monitors, labeled by a number. This number is assigned by Windows and doesn’t necessarily correspond with the order the monitors are in. If a monitor isn't being displayed here, make sure all wires are connected between the computer and display, and that all monitors are turned on and connected to power.


-
Click the “identify” button to check which monitors are associated with each number. This will show each monitor's corresponding number on that screen.

-
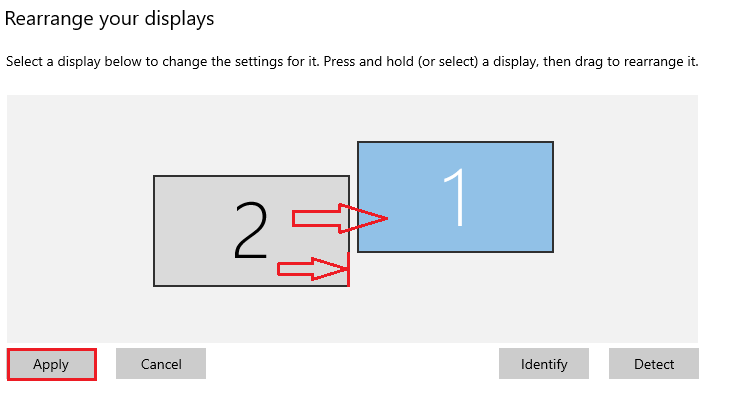
Click and drag the monitors in the Display Settings window to create a path for your mouse to move between them.

In this example, monitor 1 has been moved up and to the right of monitor 2. This means that if the mouse is moved to the right on most of monitor 2's screen, it will move into monitor 1. If it’s moved to the right on the bottom section of monitor 2, it will stop there because there is no monitor placed there for it to move to. This can be handy if you have displays that are different heights or want to place your laptop screen below your external monitors. The “rearrange your displays” menu lets you easily match your display settings to how the monitors are placed in real life.
Mirroring and Extending Displays
When connecting your laptop to external monitors, sometimes they may display the exact same thing as the laptop instead of creating more screen space; or maybe you are using a conference room computer that is connected to a large TV screen, but it’s showing a blank Windows desktop instead of your presentation. This is due to the difference between extending and mirroring:
Extending: The display extends the available screen space to give a bigger desktop area to work with.
Mirroring: The display shows an exact copy of what is on the “primary” display.
To change whether a display is extending or mirroring, you can use the “Multiple Displays” settings menu at the very bottom of Display Settings.

These settings will change the current display that is selected (highlighted blue) in the “rearrange your displays” menu. Here’s what these options do:
-
Check the “make this my main display” button to set this as your primary monitor; your desktop icons will appear here and applications will prefer opening on this monitor.
-
Click the dropdown and choose “duplicate these displays” to make all monitors display the same image, or “duplicate desktop on [current monitor] and [second monitor]” to select another display to mirror with.
-
Choose “extend these displays” or “extend desktop to this display” to not mirror this monitor and use it as an extension of the desktop.
-
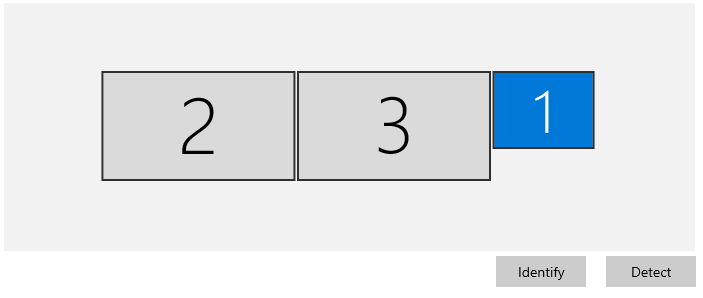
If there are more than two monitors connected, you may see an option to “disconnect this display.” If a display is disconnected, it will appear small and grayed out in the “rearrange your displays” menu:

If you’re experiencing this issue and you want to use this display, select it and then set it to mirror or extend the other monitors. If the option does not appear, try restarting the computer or disconnecting and reconnecting the display, or submit a troubleshooting ticket.